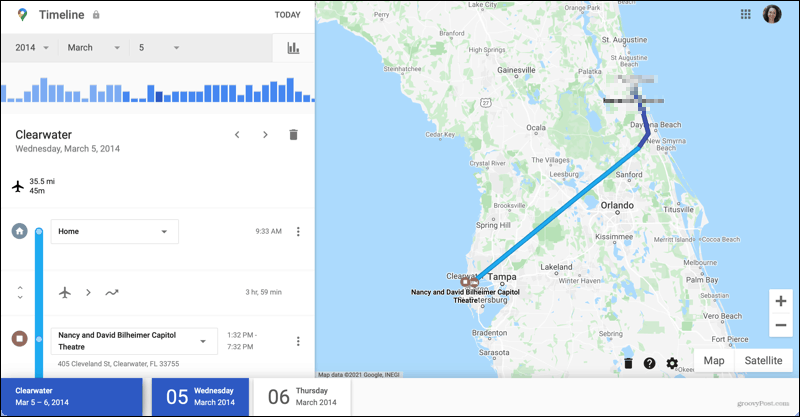
You can see every place you visited, a restaurant you ate at, the theater you enjoyed, and so much more. Take a trip down memory lane with a built-in travel diary in Google Maps.
Access Your Google Maps Timeline
Head over to the Google Maps website and sign in if necessary. Then, click the Menu icon on the top left of the Search box and select Your Timeline.
A new browser tab should open, displaying your Google Maps Timeline.
Enable Location History
Obviously, for Google Maps to capture your trips, you need location services enabled. So if you don’t see any locations on your Timeline, this is why. Either that or you haven’t left the house. If you don’t want to keep your location services turned on, you can do it for your next adventure. Then, disable it when you return. To turn on Location History, follow these steps.
Now get out there and do some traveling so that your Google Maps Timeline fills up! To disable the feature later, follow the same steps to turn off the toggle.
Show Google Photos
While not an essential piece to your Google Maps Timeline, it is one of the benefits. You can enable the Timeline to show Google Photos related to your locations and trips. Cool, right? Here’s how to turn on the feature.
Moving forward, when you capture pictures that you save to Google Photos, those will display with your Timeline trips (below).
Navigate Your Timeline
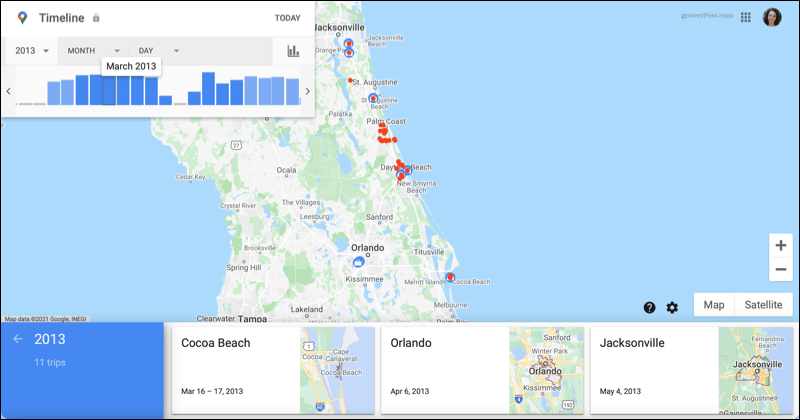
If you already had the Location History setting enabled, you should see some details at the bottom of your Timeline. So that’s where we’ll start.
Places Visited
On the left, you have several places you’ve visited. Click, and you can switch between your Most visited and all Visited spots. These display to the right, and you have some options.
Select a location to see it plotted on the map.Click the three dots and choose Last visit in your timeline. This shows you the date, time, method of transportation, and duration.Click the three dots and choose Place details. This shows you the Google Maps information for the spot, including a photo, type of location, address, hours, and more, depending on the location.
Trips Taken
Next in line is a box for the trips you’ve taken. Click More Trips to see them all. This is the best part of the Timeline for your travel diary because it automatically groups your trips.
Select a trip to see the details. You can pick a specific day during the trip at the bottom if you like. You can then review the details for that day on the left with dates, photos, methods of transport, and more. And on the right, you’ll see the day plotted on the map.
Another helpful feature is that you can edit the details for a day on your trip. Because you see each stop with the method of transportation, you may want to make a change or two. For example, maybe one of the stops was a rest area that you don’t really need to relive. Select the three dots to the right of the spot in the trip and click Remove stop from day.
You can also adjust the transportation option you use. For instance, the day may show you were “Moving” between stops. Click the box and choose from options like Driving, In a taxi, Walking, or Cycling.
View Your Timeline by Date
Along with the options at the bottom for viewing your Timeline, you can choose to see specific dates. On the top left, pick a certain year, month, and/or date. You can also use the graph below the date options to jump to a day. Click the graph icon to display it.
Any trips you took during the selected period will also be displayed at the bottom. You can select one for details as described earlier.
Take Advantage of Your Google Maps Timeline
If you already use Google Maps and even Google Photos, you can create an automatic travel diary without any effort using the Timeline feature. Relive your memorable trips with every step you take and the place you visit. For help with planning, check out how you can plan your next road trip or hiking adventure with Google Maps. On the other hand, if you are creeped out by the amount of Google stores on you, read our article on how to really stop Google from tracking your location. Comment Name * Email *
Δ Save my name and email and send me emails as new comments are made to this post.
![]()


