A package manager is a tool that lets you install, update, and remove software from a central repository with simple commands. Package managers are common in Linux systems, but Windows also has its own option: the Windows Package Manager (or winget for short). We’ll show you how to install and use the Windows Package Manager on Windows 11 below.
What is the Windows Package Manager?
The Windows Package Manager is a command-line utility that Microsoft released in 2020 as an open-source project. It allows you to search, install, update, and uninstall software from a large catalog of applications hosted on GitHub or other sources. You can use it with Windows Terminal or the older command prompt. It also supports installing both GUI and CLI applications. The Windows Package Manager uses descriptive manifest files (YAML manifests) to describe the software packages and their metadata, such as name, version, license, dependencies, and installation options. These manifests are stored in a central repository on GitHub, which anyone can contribute to. You can also create your own manifests for custom or private software. The Windows Package Manager has several advantages over the traditional way of installing software on Windows. For example, you can:
Install software with a single command without downloading setup files or going through installation wizards.Update multiple software packages simultaneously without visiting each website or opening each app.Remove software completely without leaving behind any traces or registry entries.Automate software installation and configuration with scripts or configuration files.Discover new and useful software from a curated list of applications.
If you want to try it yourself, follow the steps below to install it on your PC.
How to Install the Windows Package Manager on Windows 11
The easiest way to install the Windows Package Manager on Windows 11 is through the Microsoft Store. To install the Windows Package Manager on Windows 11: Once installed, you can run Windows Package Manager via the Windows Terminal or Command Prompt. Alternatively, download and install the Windows Package Manager manually from GitHub. This isn’t the recommended method, but if you’d prefer to do this, go to the releases page, download the latest .msixbundle file, and run the file.
How to Use the Windows Package Manager on Windows 11
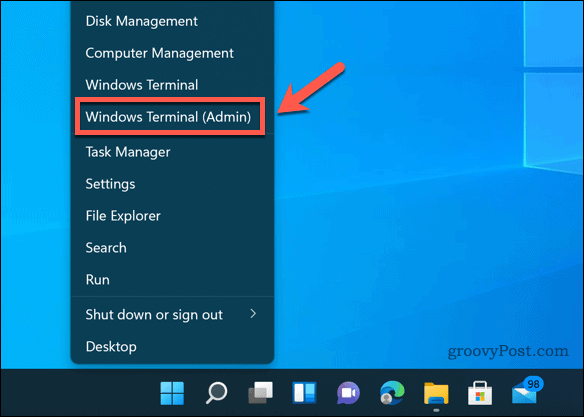
To use the Windows Package Manager on Windows 11, you need to open a new Terminal window as an administrator. You can do this by right-clicking the Start button and selecting Windows Terminal (Admin).
To check if the Windows Package Manager works properly, type: winget –info and press Enter. You should see some information about the app version, settings, log information, and more.
To see what commands are available, type: winget –help and press Enter. You should see a list of commands and options you can use with winget. Some of the most common commands are:
winget search – This command lets you search for software packages by name, tag, description, etc. For example, winget search firefox will show you all the packages related to Firefox.winget show – This command lets you see more details about a specific software package by its name or ID. For example, winget show firefox will show you information such as version, publisher, license, homepage, etc.winget install – This command lets you install a software package by its name or ID. For example, winget install firefox will download and install Firefox on your PC.winget upgrade – This command lets you update one or more software packages to their latest versions. For example, winget upgrade firefox will update Firefox if a newer version is available.winget uninstall – This command lets you remove a software package by its name or ID. For example, winget uninstall firefox will uninstall Firefox from your PC.
With these commands, you can also use various options and parameters to customize your actions. For example, you can use -e or –exact to match only exact names, -s or –source to specify a different source than GitHub, or -m to use a local manifest file, etc.
To see the full list of options and parameters, type: winget
How to Manage Sources and Settings for the Windows Package Manager
By default, the Windows Package Manager uses the Microsoft community repository on GitHub as its main source of software packages. However, you can add, remove, or update other repository sources.
To manage sources for the Windows Package Manager, you can use the winget source command with various subcommands and options. For example, you can use:
winget source list – This command shows you all the currently available sources and their status.winget source add – This command lets you add a new source by its name and URL.
You can also use the following commands to update and remove sources:
winget source remove – This command lets you remove a source by its name.winget source update – This command lets you update one or more sources to their latest versions.
You can also manage the Windows Package Manager settings by editing the settings.json file in your AppData folder. To open this file, type: winget settings and press Enter.
This file lets you configure various options such as telemetry, progress bar, auto-update settings, and more.
Managing Your Apps on Windows 11
The Windows Package Manager is a powerful and convenient tool that can help you easily install and manage software on Windows 11. It has a large catalog of applications you can access with simple commands and supports custom sources and settings. Looking for other types of apps you can install? You could install Android apps on Windows 11 using the built-in Android emulator. If there are any apps that you’d prefer to remove, you can always uninstall them from your Windows 11 PC. This is a good idea if you want to free up some disk space. Comment Name * Email *
Δ Save my name and email and send me emails as new comments are made to this post.
![]()


