If you’re paying for a Netflix subscription, you want to make sure that you’re getting the best stream quality. Thankfully, it’s possible to tweak Netflix video quality settings, but it’s not an entirely simple process. Here’s what you’ll need to do.
Netflix Video Quality Options
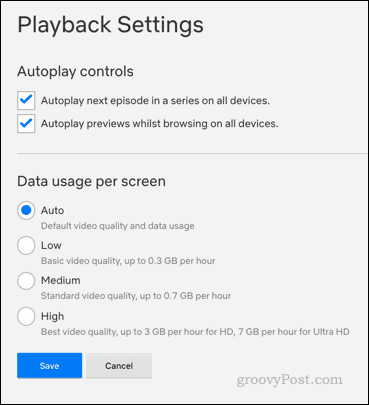
If you’ve watched videos on YouTube, you’ll know that it’s very simple to change your video quality settings. Depending on the highest resolution of the video you’re playing, with a couple of clicks, you can set the playback quality anywhere from 144p to a near-unthinkable 8K on certain videos. Netflix doesn’t make things quite that easy, because you can’t change the quality of an individual video. Instead, you can change the overall video settings for your account. Even then, things are still quite limited. For instance, you’ll only have access to 4K settings if you’re paying for Netflix Premium. If you’re on the Standard plan, you’ll have access to HD (1080p) quality content, while Basic users will be limited to 480p SD content. If you’re on a plan that allows HD or 4k content, then you can set Netflix to automatically switch to a higher quality stream. Alternatively, you can also set the stream quality manually. Setting it to Low for instance, will limit data usage to 0.3GB an hour, limiting you to quite low quality streams. If you switch to Medium, you’ll be limited to 0.7GB data usage per hour, offering a standard quality stream. Set to High, Netflix will stream at the highest possible quality available. This could use up to 3GB of data for HD (1080p) content, or 7GB an hour for 4K content. It’s important to remember that these settings will only work within the parameters of your chosen plan. If you’re on a Basic subscription, selecting your quality to High will still limit you to standard quality content.
Adjusting Video Quality on Netflix
You can adjust video quality settings from any device that you use to watch Netflix. While these steps assume you’re doing this on a PC or Mac, the same steps should work on almost all platforms, including on mobile devices, as the Netflix interface is universal. To start, sign in to your Netflix account on the web. If you have different Netflix profiles, each can have its own video quality settings. If you want to make account-wide changes, you’ll need to repeat the process for each profile. Once you’re signed in to your profile, hover over the profile icon in the top-right, then click the Account option.
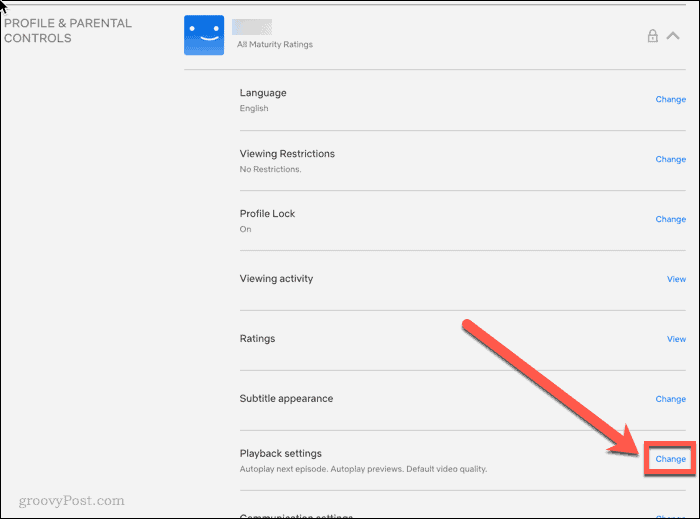
Under Profiles & Parental Controls, select the profile you want to set the video quality settings for.
Next to the Playback Settings option, press Change.
You’re given options for Auto, Low, Medium, or High quality. Select the option you want to apply, then click Save.
Your Netflix video quality settings have now been changed. If you want to change the settings for your other profiles, head back to the Account page, and repeat the process. There are also a couple of other settings you can tweak under Playback Settings. You can decide whether or not to have the next episode of a series autoplay, and you can decide whether you want previews to autoplay when you’re browsing for something new to watch.
Take Control of Netflix
Tweaking your Netflix video quality settings is just one way for you to take control of your Netflix account. While 4K is great, limiting your video settings is a smart move if you’re streaming on a capped data connection. There are other things you can do to tweak your Netflix settings, however. For instance, you can learn how to manage devices on Netflix if you’re sharing your account. If you’re watching content in other languages, you’ll want to know how to show or hide subtitles. If you’re trying to clear your recommendations, knowing how to hide specific shows and movies would be a good idea.
![]()

![]()


